

Step 1
Open the source image Merry Go Round in Photoshop and with double mouse click turn the background into a layer.
Grab a selection tool of your choice- Pen Tool or Polygonal Lasso and use it to select Merry Go Round then with Ctrl+J separate it on a new layer named Merry Go Round. Now you can delete the original image not to overload your .psd file with surplus layers. Highlight Merry Go Round layer, go to Layers menu, choose Group layers and name the new group Merry Go Round. Switch off this group as we will not work in it while performing the next steps.

Step 2
Now create a new Group of layers named Background and place it below Merry Go Round group. Name Color the first layer created within the Background group and fill it with #e3e1c6.

Step 3
Keep selected the Color layer and go to Layer, Layer Style, Inner Shadow and leave all settings as given by default. Only change the Inner Shadow Size to 250px. Keep the Layer Style box open as we will add more styles.

Step 4
Now check the Inner Glow and apply the following settings:
Blend Mode: Overlay;
Opacity and Noise: Default;
Inner Glow color: # 79118f
Technique: Softer (default);
Source: Center;
Choke: 26%;
Size: 250px;
In Quality field leave all settings as given by default.

Step 5
In this step tick Bevel and Emboss in the Layer style box and choose these settings:
Style: Inner Bevel;
Technique: Smooth;
Depth: 72%;
Direction: Down;
Size: 103px;
Soften: 16px;
Angle: 30 degrees;
Use Global Light is checked;
Altitude: 30 degrees;
Gloss Contour: Linear;
Anti-aliased is not ticked;
Highlight Mode: Screen;
Highlight Color: # 2f9ade;
Opacity: 27%;
Shadow Mode: Multiply;
Shadow Color: # 64b6c5;
Opacity: 15%

Step 6
Now check Texture in Layer Style Box and choose Dark Coarse Weave from Artist Surfaces default Textures.
Scale: 146%;
Depth: 167%;
Invert and Link with Layer are ticked.

Step 7
Duplicate the Color Layer. In order to apply its layer styles, create a new layer between Color and Color copy layer then merge Color copy and the new layer. Name the merged layer Satin then go to Layer, Layer styles, Satin. The settings are as follows:
Blend Mode: Linear Burn;
Opacity: 29%;
Angle: 19 degrees;
Distance: 184px;
Size: 250px;
Contour: Ring Double;
Anti-aliased is not ticked;
Invert is checked.
After applying Satin layer style, your image and layers palette should look like this:

Step 8
Set Blend Mode of Satin layer to Luminosity, lower its Opacity to 64% and with Eraser Tool (Soft Brush, Opacity - 50-60%) clean portions of the layer. It should only enframe the image.
Create also a new layer above Satin and call it Brushes. Set its Blend Mode to Linear Burn and Opacity to 17%. Just make a few dabs with big sized default brushes. I have used Charcoal Large Smear brush of 1000px size, color # 3c1313 and Texture 5 Brush of 900px size, black color. Then use Smudge Tool or Filter, Liquify, to extend the brush dabs like tentacles.
If you like, you can choose another brushes to add a different grunge effect, more important in this step is to smudge or liquify the edges.

Step 9
Lets add more relief to our background. Select both Color and Satin layers, duplicate them and merge both duplicates. Name the merged layer Pattern and go to Layer, Layer Style, Pattern Overlay. Change the settings as following:
Blend Mode: Linear Burn;
Opacity: 100%;
Pattern: Leaves;
Scale: 833%;
Link with Layer is ticked.
Now we are ready with the background.

Step 10
Go back to Merry Go Round group of layers and duplicate the Merry. Name the second duplicated layer Black and White and go to Image, Adjustments, Black and White. Set the layer’s Blend Mode to Darken and you will have this on your screen:

Step 11
Highlight Merry Go Round group and go to Edit, Free Transform. Scale down the object and rotate it, then move to the bottom right hand side of the image as given on the screenshot to this step.
Now merge Black and White layer with the layer below (the layer named Merry Go Round). You will see that after merging both layers, the new one automatically gets the name of the layer below, in our case- Merry Go Round. Copy the merged layer and go to Filter, Artistic, Watercolor. I used the following settings:
Brush Detail: 12;
Shadow Intensity: 1;
Texture: 2.
Also lower the Opacity to 36% and set the Blend Mode to Luminosity.
Name this layer Watercolor filter.

Step 12
Duplicate the last layer (Watercolor Filter), name the duplicate Threshold and apply Image, Adjustments, Threshold. In Threshold Level box put 152 and set the Blend Mode of the layer to Linear Dodge, also lower Opacity to 48-50%.

Step 13
Now for sure you will find the following steps a bit boring, but they are necessary to make our image look muddy.
Merge the three layers from the previous step- Watercolor Filter, Threshold and Merry Go Round. Duplicate the new merged layer (Merry Go Round) three times and name the new layers from top to bottom Gaussian Blur 1, Gaussian Blur 2 and Gaussian Blur 3 respectively.
On the first layer apply Filter, Blur, Gaussian Blur, Radius 4 px, then select Gaussian Blur 2 layer but this time apply Gaussian Blur of 70px. Take Eraser Tool (Soft Brush, Opacity 50 %) and slightly erase the right side of Gaussian Blur 2 layer.
Leave Blend Mode of these two layers to Normal and Opacity to 100 %.
Now select Gaussian Blur 3 layer and apply Gaussian Blur Filter- 80 pixels radius. Lower the Opacity of the layer to 40 %. Look what I have on my screen after performing this step:

Step 14
Duplicate Merry Go Round layer and drag it above Merry Go Round group of layers. On the duplicated layer apply Image, Adjustments, Invert or just press Ctrl+I, to invert its colors. Set its Blend Mode to Soft Light and name it INVERT. With the same layer selected go to Layer, Group Layers and name the new group Motion. Your screen should look like this:

Step 15
Duplicate twice Merry Go Round layer and place both layers below the inverted one in Motion group. Apply on both layers Filter, Blur, Gaussian Blur 9-10% and using Eraser Tool with soft brush chosen, clean parts of the layers so that only their blurred bounds to be left. I have named the layers Merry Go Round copy 1 and copy 2 respectively. Set the Blend Mode of Merry Go Round copy 1 to Pin Light and change the Blend Mode of Merry Go Round copy 2 to Color Dodge.
Look at my screen shot below because I have scaled down and put aside both layers for you to see how they should look after erasing and blend mode change.

Step 16
Duplicate twice Merry Go Round layer again and put both copies above Merry Go Round Invert layer. Name them Merry Go Round copy 3 and copy 4. With Merry Go Round copy 3 selected go to Eraser Tool, choose soft brush, 200-250px, Opacity 30% and erase parts of the object so that only the bottom part of it to be left intact and only traces of the upper part to be seen. Now go to Merry Go Round copy 4 and change Blend Mode to Soft Light and Opacity to 23%.
Both layers switched on should look like this on your screen:

Step 17
Duplicate Merry Go Round again and apply Filter, Blur, Motion Blur with angle 17 degrees and Distance 800px. Name the layer Motion Blur and change its Blend Mode to Overlay. While the layer is selected, go to Add Layer Mask icon at the bottom of your Layers Palette, take Soft black brush and erase most parts of the Motion Blur layer. We need only the bottom left hand part to create a feeling of motion and flying. This layer is placed above Merry Go Round copy 4.

Step 18
It’s time now for the next duplicate of Merry Go Round layer. Name the copy Merry Go Round Motion and place it above the previous Motion Blur layer. Apply Layer Mask and with soft black brush of bigger size erase most of the left and right parts of the object.

Step 19
Duplicate Merry Go Round twice and place the layers above the last created layers. Name the first duplicate Motion Blur Upper Part, set its Blend mode to Darken and Opacity to 84%. Name the second duplicate Motion Blur Bottom Part, with layer’s Blend Mode changed to Overlay. On both layers apply Filter, Blur, Motion Blur and repeat the same settings we used for the first Motion Blur layer.
Well, we are off with the boring part of preparing our Merry to go wild.

Step 20
Now comes the fun part. Create a new Group and name it Ribbons and Shapes. With the help of Polygonal Lasso Tool select parts of the roof of Merry go Round (I have indicated them with light yellow circles and arrows), then merge the parts into one layer, named Parts of the roof and place it in the new created Ribbons and Shapes Group. To give these tiny parts more volume I applied Layer, Layer Style, Bevel and Emboss and left all default settings except Direction- tick Down option.

Step 21
Select more small parts of the roof and merge them in one layer named Parts Soft Light. Place it below the layer created in the previous step. Set the blend mode of the layer to Soft Light and Opacity to 27-30%. I have applied Blending Options, Bevel and Emboss to those parts to give them volume.
The Bevel and Emboss settings are like this:
Style: Pillow Emboss;
Technique: Smooth;
Depth: 286 %;
Direction: Up;
Size: 6 px;
Soften: 0 px;
Angle: 30 degrees;
Use Global Light is checked;
Altitude: 30 degrees;
Gloss Contour: Linear;
Anti- Aliased is not checked;
Highlight Mode: Screen
Opacity: 75 %;
Color: # 3c0a4d;
Shadow Mode: Multiply;
Opacity: 82%;
Color: # 000000

Step 22
Now put your imagination into action. Select small parts of Merry Go Round and on each of them apply Edit, Free Transform to extend them. Use also Edit, Transform, Warp to curl the ribbons. Arrange them so that they look as blown by the wind. Play with Opacity and Blend mode of each ribbon layer. In the next screen shot you’ll see that I have indicated with yellow those parts of Merry Go Round I have taken to make the ribbons. With red arrows I have shown Blend Modes applied.
Use Polygonal Lasso and Lasso to select more small particles and spread them around the left bottom part of Merry Go Round.

Step 23
This step is a child’s play. Just select some parts of Merry Go Round and scale them with Edit, Free Transform then turn them into butterfly’s wings by using Edit, Transform, Warp. Use Black Brush to draw the antennae of the butterflies. Our flying creatures are ready now. On the screen shot given to this step you can see which parts I have chosen to transform into butterflies.

Step 24
Create a new group placed at the top of your layers palette, named Front Flowers and Butterflies. Place both type of butterflies created in the previous step within this group, duplicate them and arrange the insects to fly above Merry Go Round. Scale them with Free Transform (Ctrl+T) and rotate to give them a scattered look.
You can see there is a nice flower on one of the carriages. Select it and duplicate a few times then spread the flowers in your image the way you did with the butterflies.
Select also some of the carriage wheels and do the same- duplicate and transform them through Ctrl+T.
Select also the carriage itself and a part of the brown horse in front and make them fly too.
Play with Blend Mode and Opacity of the scattered stuff. I have given the changes in the following screenshot.

Step 25
Now it’s time to merge again. Highlight all layers from Front Flowers and Butterflies group and go to Layer, Merge Layers or apply the same action by right mouse click and choose Merge Layers. Name the new layer Merged Front Objects and place it below all layers in the group. Go to Filter, Blur, Motion Blur, Angle: minus 32 degrees and Distance: 34px. Change the opacity to 45% and now your image and layers palette will be looking like this:

Step 26
In this step we’ll need to select more wheels and flowers from the front carriage, also one of the horses’ heads and two horse legs. Duplicate the white horse leg then slightly change its shape and size by means of Edit, Transform, Warp and Edit, Transform, Distort. Then go to Image, Adjustments, Desaturate to make the horse head black and white. You can desaturate also through Image, Adjustments, Hue/Saturation and moving the Saturation arrow to -100. For the sake of diversity, make black and white also one of the legs. Merge all these spattered parts layers, keep the Blend Mode of the new merged layer to Normal and Opacity to 100% and name it Parts_Normal Blend. Put this layer in a group named Background Objects placed above the Background group.

Step 27
Now just duplicate some of the butterflies and parts of Merry Go Wild, as well as two of the ribbons we made in Step 22. Move them to the last created Background Objects group. Arrange them and play with their Blend modes and Opacity. Look at the following screen shot. I have named the layers according to the objects they contain and the blend modes used. Opacity settings are also given. For your convenience I have switched off all groups except Background and Background Objects in which we work.

Step 28
Now we should make Merry Go Round looking wilder by adding more motion blur. Highlight all layers within Background Objects group, duplicate them and merge the duplicates. Name the new layer Motion Blur, place it below all layers in the group and go to Filter, Blur, Motion Blur, Angle: - 32; Distance: 24px. Set Blend Mode of this Motion Blur layer to Darken and Opacity to 80-82%.
To add more grunge effect create a new layer above all layers in the group and name it Spatter Brush. Set your foreground color to black and make random spots with one of the default spatter brushes. Change the Blend Mode of the layer to Linear Burn and Opacity to 18%.
I have marked with green both last created upper and bottom layers to be easily recognized on the following screenshot.

Step 29
Create a new layer named Brushes and place it above all groups. Use a big Soft Brush, color # B5D0C5 to draw lines at the lower left part of the image and apply 15px Gaussian Blur. After that select Spatter Brush of approximately 200px size, color # B6B791 and make some dabs at the bottom part. Choose also Soft Round Bristle Brush, 1000px size to add some small purple spots “going out” from the left side of Merry Go Round. The color I have used is # cd9cd0. Change Blend mode of Brushes Layer to Linear Burn.

Step 30
Our Merry Go Round looks pretty wild for now and if you are fed up of chopping you can stop to this step. If not, let’s add some adjustment layers to make her looking really stunning.
Start with Layer, New Adjustment Layer, Color Balance, and change only the Midtones settings to: Cyan: +14; Magenta: - 15; Yellow: -32; Preserve Luminosity is ticked.
Now take big Chalk (default) brush with black color and start painting while the mask is selected to remove parts of the Color Balance layer. Clean parts of both left and right hand side of Merry Go Round. I lowered the opacity of the chalk brush to 60%. Change the Blend Mode of the layer to Color.

Step 31
Go again to Layer, New Adjustment Layer, Black and White and leave the default settings. Use Soft Black Brush of lowered opacity (about 50%) to erase parts of the black and white layer covering Merry Go Round. Change Blend Mode to Color and Opacity to 21%.

Step 32
The next adjustment layer we should add is Photo Filter. Go to Layer, New Adjustment Layer, Photo Filter then from the Filter’s drop down menu choose Underwater- the last one of all filters. Change only the Density to 42%. Keep the opacity of the layer to 100% and change its Blend Mode to Soft Light. Use Soft Black Brush (60% opacity) to clean parts of the layer above Merry Go Wild.

Step 33
The fourth adjustment layer is Posterize. Go to Layer, New Adjustment Layer, Posterize and set the Levels to 12. Change Blend Mode to Multiply and Opacity to 29%. Again put into action the soft black brush with lowered opacity to clean parts of the adjustment layer above Merry Go Wild and to the left of it.

Step 34
Press D key to set your fore- and background colors to the default black to white. Go again to Layer, New Adjustment Layer, Gradient Map and choose the first Black to White (linear, fore- to background) gradient. As you can see from the screen shot, the blend mode of this layer is Saturation and opacity is set to 45%. I have erased with soft black brush only the left part of the layer.

Step 35
No more steps, this is the last one. Go to Layer, New Adjustment layer, Gradient Map and choose Rust, Green, Gold default gradient from Color Harmonies 2 set. Change the blend mode of this last adjustments layer to Overlay, and lower its Opacity to 24%. Grab your Big Soft Black Brush again, with opacity set to approximately 40% and while the layer mask is selected brush to fade the gradient effect. Leave only the upper left diagonal untouched.
That’s all for this tutorial. Have fun when performing it and don’t hesitate to send me a PM or just to post a comment if you find something difficult or not very well explained.

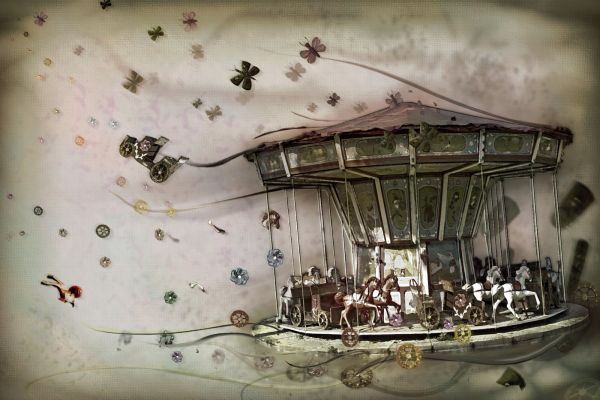
Step 36
After performing all 35 steps your Merry Go Wild will be looking like this

0 Response to "Photoshop Tutorial: The Making of Merry Go Wild"
Post a Comment